
MySQL, the most popular and reliable open-source relational database management system, is no longer available with RHEL’s repositories. After releasing Red Hat 7, the default repositories of RHEL is supporting MariaDB as a default Relational database system. MariaDB is backwards compatible with MySQL, and it is the perfect replacement of MySQL.
In this article, we will learn how to install MySQL into Red Hat Enterprise Linux (RHEL) 7 Operating System.
Prerequisites
To start MySQL installation on RHEL 7, we need a system running with RHEL 7 operating system and a user to login into the system with sudo privileges as we need to run installation and configuration commands with sudo permission.
As I have already mentioned, MySQL is not coming with default centos default repositories, so we need to install the package using MySQL Yum Repository.
In this tutorial, we have two sections to install MySQL 8.0 and MySQL 5.7 into RHEL 7.
You should install any one version in your Red Hat machine, and If you have any doubt to choose a version of MySQL, I suggest you go through with your required application’s documentation and choose a compatible version of MySQL.
Install MySQL 8.0 on RHEL 7
You can follow the below process to install MySQL 8.0 into your RHEL 7 System:
Step 1 – Enable MySQL 8.0 repository
You can enable the MySQL 8.0 repository into your Red Hat system by using the following command:
$ sudo rpm -Uvh https://repo.mysql.com/mysql80-community-release-el7-3.noarch.rpm

Step 2 – Install MySQL 8.0
After enabling the repository, you can install MySQL using the following command:
$ sudo yum install mysql-community-server
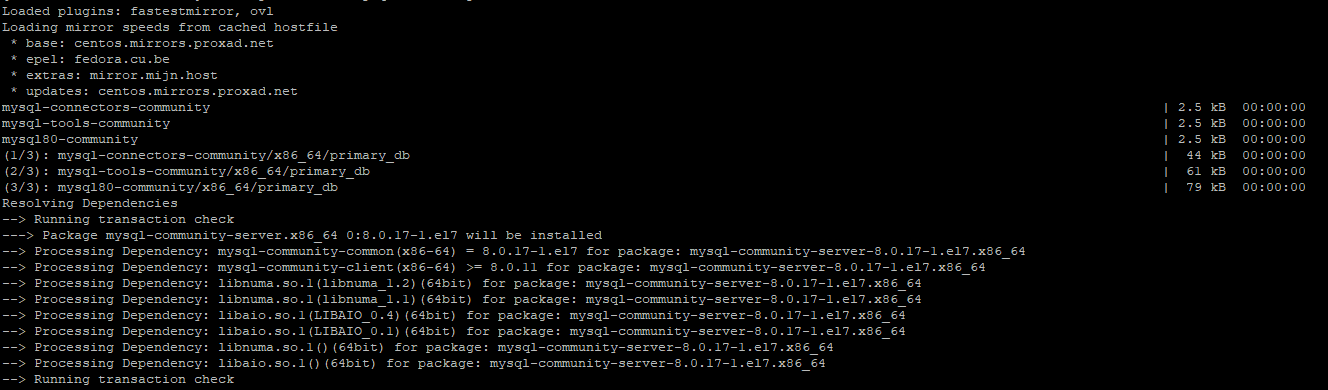
While installing MySQL yum may ask to import the MySQL GPG key, you should allow y type “y” and hit Enter.
Install MySQL 5.7 on RHEL 7
you need to follow below steps to install the previous stable version of MySQL is 5.7:
Step 1 – Enable MySQL 5.7 repository
To enable MySQL 5.7 repository on RHEL 7 need to execute below command on terminal:
$ sudo yum localinstall https://dev.mysql.com/get/mysql57-community-release-el7-9.noarch.rpm
Step 2 – Install MySQL 5.7 package
You can install mysql 5.7 community server package by using the following command:
$ sudo yum install mysql-community-server
MySQL Service Management
After the installation of MySQL, you should start and enable the MySQL service.
To start the MySQL service use following command:
$ sudo systemctl start mysqld
To enable the MySQL service so it can automatically start on system startup, use the following command:
$ sudo systemctl enable mysqld
You can check the MySQL service status by using the following command:
$ sudo systemctl status mysqld

MySQL Securing
When MySQL successfully get installed and started, a temporary root password generated to login into MySQL.
You can find the temporary root password by using the following command:
$ sudo grep ‘temporary password’ /var/log/mysqld.log

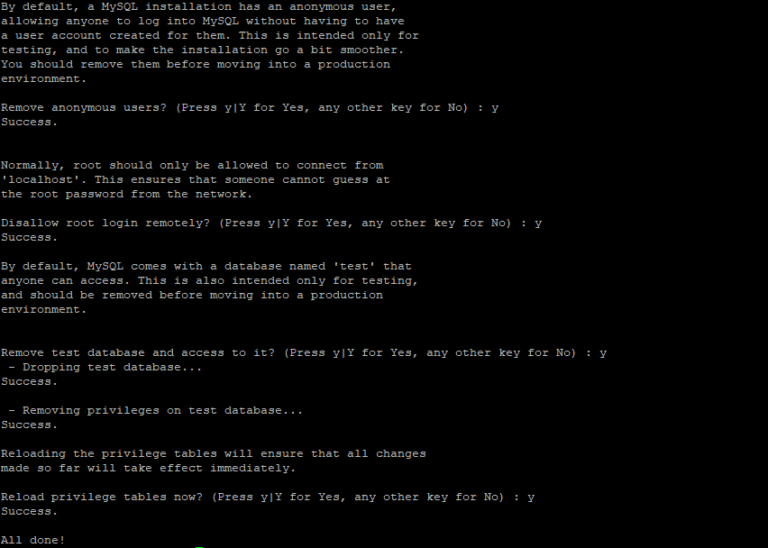
To make your MySQL secure need to run the “mysql_secure_installation” command as shown below:
$ sudo mysql_secure_installation

After entering the temporary password, you get a prompt to enter a new password for the root user. You can set the new password with your choice which is at least 8-character long and contain one uppercase letter, one lowercase letter, one number and one special character.

The script will ask more thing like remove anonymous user, restrict root access from localhost and remove test database.
You should type “Y” to answer in “Yes” for those questions.
MySQL connection from Command Line
We are using MySQL client to connect with MySQL server which installed with MySQL server.
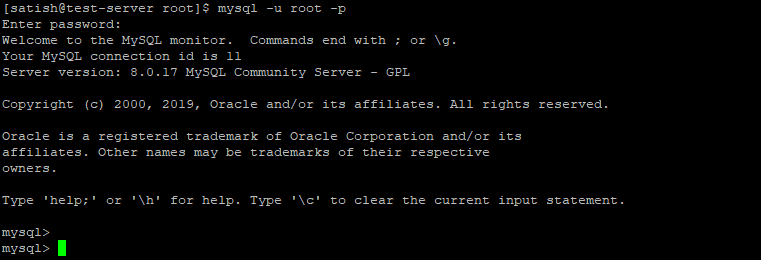
To login into MySQL server using root user, as shown below:
$ mysql –u root –p
After entering the command, you will have prompted to enter the root password and when successfully login into the MySQL server as shown below:
Conclusion
Now you have learned the process to install MySQL on RHEL 7 Operating System. You also know how to connect with MySQL Server.
Hi
I have installed successfully
Please let me know where is config files, log files location path, port,
Hey Selvavel,
You can get the information like below:
Config File location – /etc/mysql/mysql.conf.d/mysqld.conf
log File location – /var/log/mysql.
MySQL default Port – 3306