Rocket.Chat is a very popular open-source team communication system; it is famous as an alternative to Slack. It provides various features along with helpdesk chat like video conferencing, voice messages, file sharing, API, and many more.
Suppose you want to host a team communication system in your premises/servers, the Rocket.Chat is the best option for you; either you are a community or a company.
In this tutorial, we will show how to deploy Rocket.Chat on a CentOS 8 server and configure Nginx reverse proxy for access on default HTTP and HTTPS port.
Prerequisites
Before starting this tutorial, make sure you have the following:
- CentOS 8 Server machine with at least 1 GB RAM, as per the Rocket.Chat system requirements.
- Nginx is installed in the server to configure reverse proxy.
- A domain name is pointing to your server’s IP address. Here in this tutorial, we will use “chat.testsite.com.”
Install Node.js
First, update your system package list:
$ sudo yum updateNow, install Node.js and npm and other dependencies for building npm packages by using the following command:
$ sudo yum install epel-release curl GraphicsMagick gcc-c++
$ sudo yum install -y nodejs npm
We will use the “n”, an npm package which is use to manage Node.js versions.
Use below command to install “n”:
$ sudo npm install -g inherits nNow, using “n” install Node.js version 8.11.3 by using the following command:
$ sudo n 8.11.3Installing MongoDB
The default database used by Rocket.Chat is called MongoDB. It is a NoSQL document-oriented database system.
We will install MongoDB from the official repository of MongoDB.
To enable the MongoDB repository, Configure MongoDB repository file:
$ sudo vim /etc/yum.repos.d/mongodb-org.repo[mongodb-org-3.6]
name=MongoDB Repository
baseurl=https://repo.mongodb.org/yum/redhat/$releasever/mongodb-org/3.6/x86_64/
gpgcheck=1
enabled=1
gpgkey=https://www.mongodb.org/static/pgp/server-3.6.asc
After enabling the MongoDB repository, update the package list, and install MongoDB package using the following command:
$ sudo yum update
$ sudo yum install mongodb-org
Once the installation of MongoDB completed enable and start MongoDB service using commands below:
$ sudo systemctl start mongod
$ sudo systemctl enable mongod
Create new System User
To avoid running Rocket.Chat service from root user due to security issues; we are creating a new user named “rocket” to run the Rocket.Chat services:
$ sudo useradd -m -U -r -d /opt/rocket rocketNow add the nginx user to the new user group and change the rocket chat installed directory (/opt/rocket) permissions so that the Nginx can access the Rocket.Chat installation:
$ sudo usermod -a -G rocket nginx
$ sudo chmod 750 /opt/rocket
Installing Rocket.Chat
First, change the user console to rocket user:
$ sudo su - rocketNow, we assume that you are executing installation all commands as user “rocket.”
To install Rocket.Chat, first download the latest stable release of Rocket.Chat using the curl command:
$ curl -L https://releases.rocket.chat/latest/download -o rocket.chat.tgzAfter completing the download, extract the archive files and rename the directory with the name “Rocket.Chat”:
$ tar zxf rocket.chat.tgz
$ mv bundle Rocket.Chat
Now, go to the server directory (Rocket.Chat/programs/server) and install all required npm packages, using the following command:
$ cd Rocket.Chat/programs/server
$ npm install
Once the all package installation is completed, to test the installation before configuring the system unit and Nginx reverse proxy, we will set the required environment variables and start the Rocket.Chat server.
To set the required environment variable use below commands:
$ export PORT=3000
$ export ROOT_URL=http://chat.testsite.com:3000/
$ export MONGO_URL=mongodb://localhost:27017/rocketchat
To start Rocket.Chat server goes back to the “Rocket.Chat” directory and start Rocket.Chat server by using the following command:
$ cd ../../
$ node main.js
If your Rocket.Chat server stated successfully and not getting any error you will get the below screen on your terminal.
Output -
➔ +---------------------------------------------+
➔ |                SERVER RUNNING               |
➔ +---------------------------------------------+
➔ |                                             |
➔ |  Rocket.Chat Version: 0.71.1                |
➔ |       NodeJS Version: 8.11.3 - x64          |
➔ |             Platform: linux                 |
➔ |         Process Port: 3000                  |
➔ |             Site URL: http://0.0.0.0:3000/  |
➔ |     ReplicaSet OpLog: Disabled              |
➔ |          Commit Hash: e73dc78ffd            |
➔ |        Commit Branch: HEAD                  |
➔ |                                             |
➔ +---------------------------------------------+
Now stop the Rocket.Chat server by issuing CTRL + C.
Now, switch back to your sudo user by executing “exit” command and continue to the next steps.
Create a Systemd unit
To run Rocket.Chat server as a service, need to create a system unit file “rocketchat.service” in the directory “/etc/system/system/.”
$ sudo vim /etc/systemd/system/rocketchat.serviceCopy and paste the following code into the file:
[Unit]
Description=Rocket.Chat server
After=network.target nss-lookup.target mongod.target
[Service]
StandardOutput=syslog
StandardError=syslog
SyslogIdentifier=rocketchat
User=rocket
Environment=MONGO_URL=mongodb://localhost:27017/rocketchat ROOT_URL=http://chat.testsite.com:3000/ PORT=3000
ExecStart=/usr/local/bin/node /opt/rocket/Rocket.Chat/main.js
[Install]
WantedBy=multi-user.target
Now, inform the system that we have include a new unit file and start the Rocket.Chat service by using the following commands:
$ sudo systemctl daemon-reload
$ sudo systemctl start rocketchat
Check the service status by using the command below:
$ sudo systemctl status rocketchat● rocketchat.service - Rocket.Chat server
Loaded: loaded (/etc/systemd/system/rocketchat.service; enabled; vendor preset: disabled)
Active: active (running) since Tue 2018-04-10 20:30:56 UTC; 8s ago
Main PID: 32356 (node)
CGroup: /system.slice/rocketchat.service
└─32356 /usr/local/bin/node /opt/rocket/Rocket.Chat/main.jsAnd enable the Rocket.Chat service to start automatically on system boot time using the following command:
$ sudo systemctl enable rocketchatConfigure a reverse proxy using Nginx
You can follow how to install Nginx on CentOS 8 and how to secure Nginx with Let’s Encrypt on CentOS 8 guides to install and configure SSL in your CentOS 8 server.
We assume you have already installed the Nginx web server, so you need to create a new Nginx server block for Rocket.Chat access through the proxy.
First, create a server block configuration file for Rocket.Chat with the following configuration:
$ sudo vim /etc/nginx/conf.d/chat.testsite.com.confupstream rocketchat_backend {
server 127.0.0.1:3000;
}
server {
listen 80;
server_name chat.testsite.com;
include snippets/letsencrypt.conf;
return 301 https://chat.testsite.com$request_uri;
}
server {
listen 443 ssl http2;
server_name chat.testsite.com;
ssl_certificate /etc/letsencrypt/live/chat.testsite.com/fullchain.pem;
ssl_certificate_key /etc/letsencrypt/live/chat.testsite.com/privkey.pem;
ssl_trusted_certificate /etc/letsencrypt/live/chat.testsite.com/chain.pem;
include snippets/ssl.conf;
include snippets/letsencrypt.conf;
access_log /var/log/nginx/chat.testsite.com-access.log;
error_log /var/log/nginx/chat.testsite.com-error.log;
location / {
proxy_pass http://rocketchat_backend/;
proxy_http_version 1.1;
proxy_set_header Upgrade $http_upgrade;
proxy_set_header Connection "upgrade";
proxy_set_header Host $http_host;
proxy_set_header X-Real-IP $remote_addr;
proxy_set_header X-Forward-For $proxy_add_x_forwarded_for;
proxy_set_header X-Forward-Proto http;
proxy_set_header X-Nginx-Proxy true;
proxy_redirect off;
}
}Now, reload Nginx service for changes to take effect:
$ sudo systemctl reload nginxConfiguring Rocket.Chat
Now your Rocket.Chat instance successfully installed and running to configure the primary setting of Rocket.Chat open in your browser https://chat.testsite.com.
You will get the Rocket. Chat setup wizard on your browser, which will guide you through setting up admin user, configure organization, and register your server to receive the free push notification and many more.
The first screen of the setup wizard will ask you to set up an Admin user:
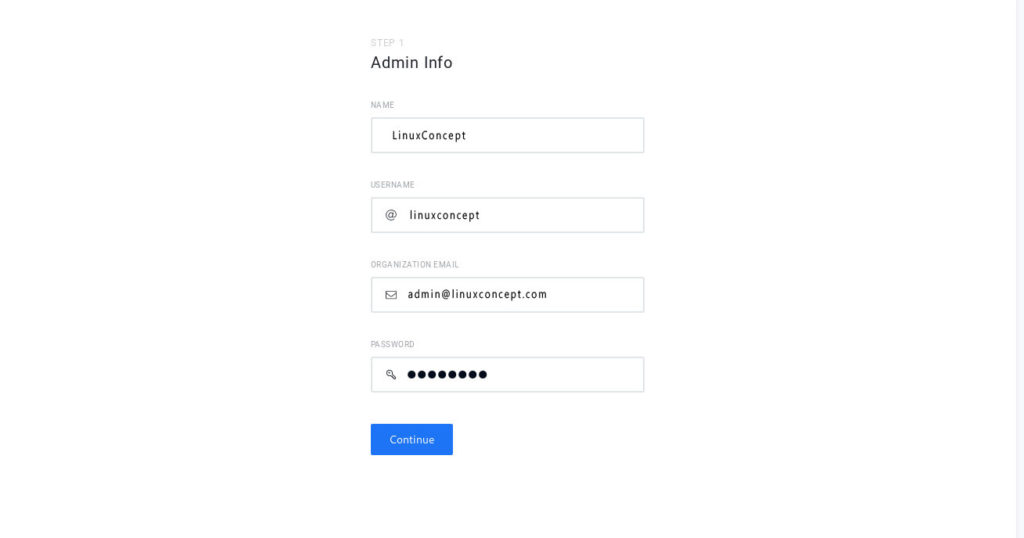
After filling the admin user’s information, the next screen will ask you the information to configure the Organization:
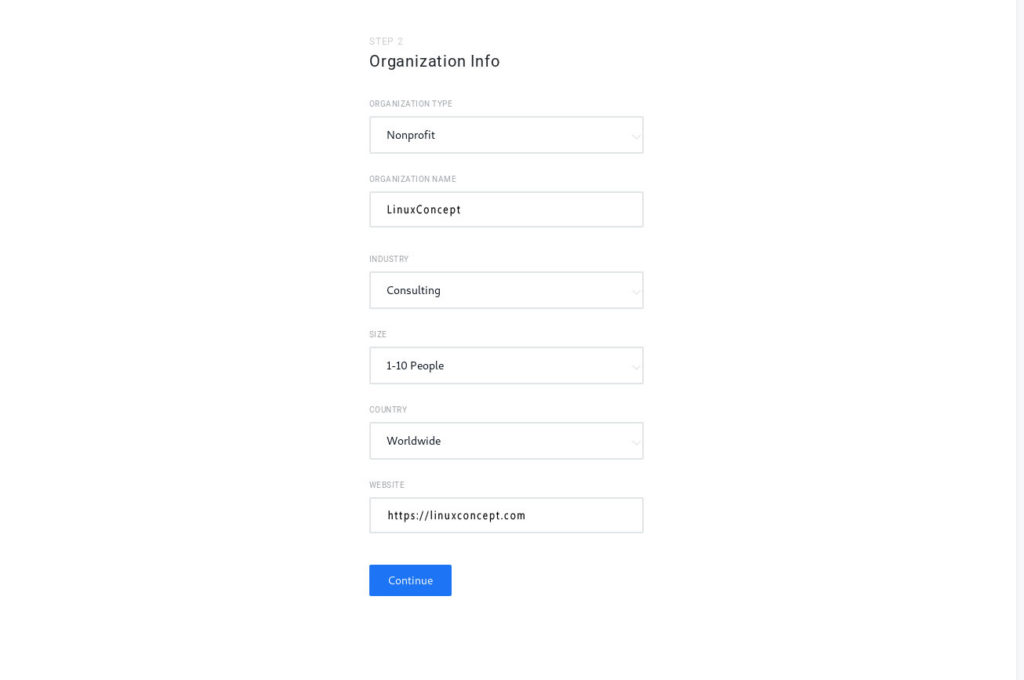
Once you filled the Organization information, the next screen will ask you to enter the server information.
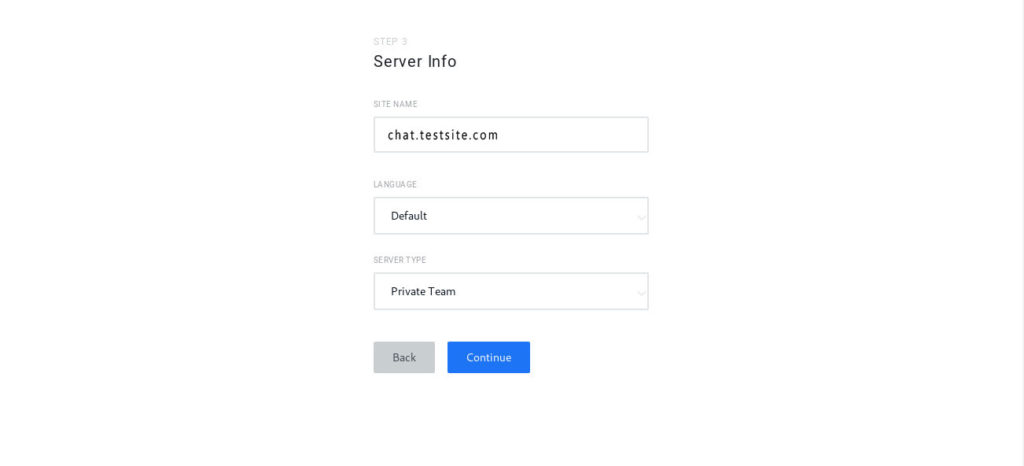
In the next step, it will ask the user Rocket.Chat preconfigured gateways and proxies. Selecting these option will give access to the Rocket.Chat apps marketplace and other features such as push notifications etc.

Click on the continue button after making your choice will give you the next screen, which indicates that your workplace is ready to use:
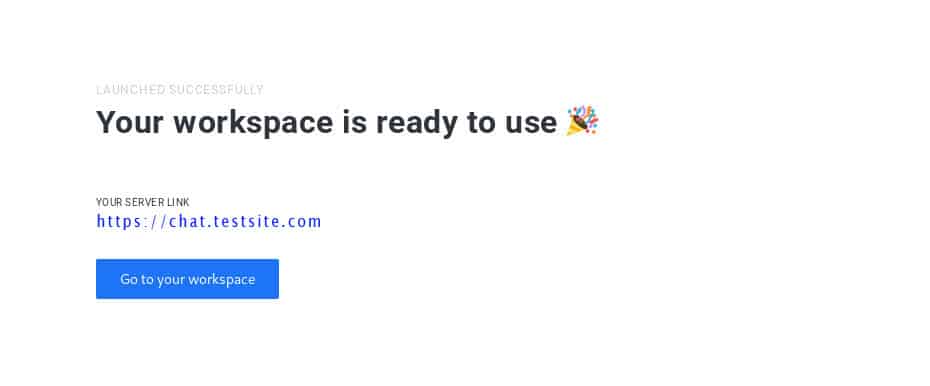
Click on the “Go to your workplace” button, and you will get into the Rocket’s dashboard.Chat logged in as the admin user.
Conclusion
Now, you have learned how to install Rocket.Chat in the CentOS 8 server and how to configure Nginx as a reverse proxy for Rocket.Chat.
If you want to get more information on Rocket.Chat or wished to get an official guide on Rocket.Chat visit the Rocket.Chat Documentation page.
If you are facing any problem in installation or having doubt or feedback, feel free to leave a comment.

0 Comments